Thursday, July 26, 2007

He's a Maniac...

...Maniac on the... ceiling?

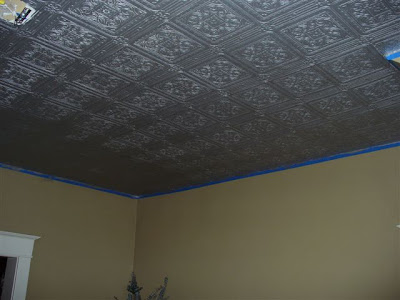
I think Chris' desperation for this project to be over has peaked. Today after work he finished painting the ceiling:

And installed the sink flange:


And installed the disposer:
And now we have a functioning kitchen sink!
I accused Chris of beginning to enjoy home improvement projects, but he assured me that this is not the case. He is merely desperate to have a working kitchen again.

Until the missing light fixture parts and the new updated Hoosier cabinet come in, there's really nothing more that we can do. I have some organization projects planned for this weekend in the event that the parts don't arrive. Maybe I could straighten up some other rooms of the house that have been neglected for too long... nah.

Tuesday, July 24, 2007

Magic Painting

While I am sitting in a clean, climate controlled, whirpool tub-having, hotel suite (I was upgraded this week), Chris is slaving away at home to finish the painting on the kitchen ceiling. He says that the photos don't do it justice, but I think they look pretty AWESOME!


The paint is a specialty metallic finish that I searched far and wide for. It's allegedly very difficult to roll on because you have to finish the strokes all in the same direction so that the metal particles are all lined up. Chris is applying it with a brush to avoid this and he said that it's taking him about 4 minutes per square. That's either dedication to a job well done or desperation for this project to be over, I can't decide which.

Monday, July 23, 2007

Kitchen Lighting

This is the new fixture over the sink. We didn't have a fixture there before, so this is a very exciting thing.


This is the only good thing that has happened with the light fixtures for the room. When the island fixture arrived, there was much excitement, but then we discovered that the shades were broken. This is easy enough to fix, manufacturer's deal with this all the time. I sent an email and they assured me that the new shades were on their way. Great! Now we can install the fixture and just wait for the shades, no need to send the whole thing back. I assemble the fixture and strip the wires and Chris was standing on the island waiting and then I realized (yep, I didn't realize until this point, sad, I know) that the mounting bracket and chains that the fixture are supposed to hang from are missing. I sent another email and I got the same response, but still no parts. It's been two and a half weeks and this is holding up the whole punch list and I would totally call them up and give them what for, but no one picks up the phone there, they just have a recording that says to submit questions via email! Maybe they've had too many talking to's in the past. I am definitely going to send a semi-harsh email now!

Grandma's Plates

Since we moved into this house, I have been searching for some beautiful artwork for our dining room. This is really the only room in the house that has a lot of wall space. All of the other rooms are full of windows and doors and chimneys so decorating them didn't require a lot of thought. The beautiful artwork had to fulfill a couple of requirements. It had to take up a lot of horizontal space, and it had to be relatively cheap. We are not in the 'art collector' phase of our lives yet.


Grandma to the rescue! My Grandmother, Shirley D, painted these plates when I was a kid. They've hung in her house for as long as I can remember and I have always loved them, so I was very happy to be the lucky recipient when my grandparents moved to a smaller home recently.


This isn't a great photo, but if you click on it you can see them in more detail. They fulfill all of my requirements, AND they have sentimental value. Thanks Grandma!


More Kitchen Work...

This was a big day in the kitchen project, it is probably the last full day of work needed. Everything else that needs to be done can be finished an hour or two at a time. This was also the most stressful day, the day that I could ruin the most expensive things.

The first thing that we could ruin was the subway tile. The people who installed the previous counter top used really large amounts of caulk, so we had to be very careful prying the backsplash away from the tiles. We managed to uninstall the counter with only 1 broken tile and two that were pulled out of their grout. A number of tiles that would've been behind the backsplash were also missing. We found some tiles under the counter on top of the cabinets, but we are still missing 2.5 tiles. I will head to the Historic Albany Foundation Parts Warehouse this weekend to try to find properly worn replacements.

The second thing I could ruin was the sink. Someone from the Old House Web forum suggested I look for sinks at Ikea. I shot her down and then marched out and bought a sink from Ikea. It wasn't expensive, but it took two trips to Paramus, NJ to get it and I didn't want to make a third trip. The sink only had one faucet hole and we needed two so I got out my trusty Off Brand Rotary Cutter and porcelain bit and hoped for the best. I taped everything because I was worried about chipping, but it turns out that the OBRC worked like a dream.

The third thing I could ruin was the counter top. Fortunately the sink installation didn't require me to cut a rectangle in the oak slab, I don't think my 10$ jig saw would've been up for the job. Since I didn't think my wimpy cordless circular saw (it seems I don't have a lot of faith in my tools) was going to do a very nice job either, we dragged the 9 foot long, 100 pound counter top to the basement so we could cut it on the table saw. This worked superbly, but it was a little nerve wracking for me. Obviously I couldn't use the fence, so I tried to dig up some geometry skills to ensure a square cut. I'm not saying that the cuts were square, but I'm saying that if you don't have a T-square with you and you squint your left eye a little, they look pretty good.

The right side of the counter butts up against the wall, so I tried to scribe it and then measured that angle and then tried to cut it so it would fit. For this one you'd have to squint both eyes, but it looks OK. The back corner is about 1/2" from the wall, but when I put the cookie jar full of dog treats there no one will know, so don't tell them.

Here are some pics:


The oil rubbed bronze disposer flange has not arrived yet, so the sink is not fully functional, but Chris finally got the right supply lines yesterday (plumbing always requires at least 3 trips), so we have water. Hurrah!

The gap on the right side of the sink is where the disposer switch will go when we get that wired up.

I'm sure I'll ruin something during that project too...

Cook Nook... Before and After

I am making the executive decision to call this portion of the kitchen 'Finished'. OK, it's not really 100% finished, but we're down to the punchlist and we're frozen where we are until the missing parts for the island light fixture arrive. I work as a consultant, so I am skilled at declaring things Finished!

This is what the Nook looked like before the snow storm that caused the Hole:


I just realized that in the photo it may look like Chris and I are drinking heavily. This is surely not the case. The night this photo was taken we were hosting a very innocuous baby shower and we were merely making 'punch'.

And this is what the Nook looked like not so long ago. I would say that was the low point.

Here are the most recent photos:


At some point I plan to build a cabinet that matches the other kitchen cabinets to put on the left side of the stove. By 'some point' I mean, 'when I acquire the woodworking skills for cabinet making', so that could be a while. It's definitely not on the punch list.

Thursday, July 12, 2007

Old House Confessions

I have finally decided to come clean. I hate landscaping. I don't like being hot and I sunburn easily and the thing that I really hate about it is that you can work for hours in the garden and a month later, it doesn't look like you did anything... oh, also there's the spiders. Terrified of spiders. The whole nurturing and growing thing is lost on me and if a concrete slab looked as good as a perennial garden, the cement mixer would be backing up to the house as I type.

I didn't even know where to begin with the existing perennial gardens in our yard. Looking out the kitchen window made me feel sick. We have kind of a snarky neighbor and I was imagining how she must complain to her husband about our disgusting jungle of weeds. There were three major planting beds, one that was roughly 17' square, one long narrow one 10'x 30' and then along the back side of the house there was a bed the width of the house and about 6 feet deep. Each of these beds was chock full of overgrown junk that stood about 4 feet high. Imagine how many spiders could hide in there, I get the heebeejeebees thinking about it.

Enter Mike and Judy M:

Chris' lovely parents LOVE landscaping! They love it in all of it's phases. Local Legend Mike M. seems to especially love the clearing of the land. He spent whole days (90 degrees, 95% humidity) tearing out the overgrown gardens and filling up yard waste bags, 22 in all. Mostly I pushed the wheelbarrow and moved rocks from one pile to another, then, when it was nearing time to plant, so I spent two separate half days with Judy M at the nursery picking things out. All the while LLMM was still slaving away, preparing for planting. Then it actually was time to plant and I pointed to spots on the ground where the holes should be and then I carried buckets of mulch from our chipper-palooza down to the beds. Basically, I only enabled the work, I didn't actually participate. Oh oh, I did sprinkle the grass seed around, that was really hard work, and I was bitten by a bug and it still is itchy, so there's that.

All of the credit for the amazing transformation belongs to LLMM and JM . Here are some in progress photos. This weekend I'll post some photos of the end result.

Saturday, July 7, 2007

Vacation... How Relaxing...

We have been on 'vacation' all week, so I haven't been posting. It's hard to type when you're chock full of wine and cheese. Chris' parents' showed up last Friday for a couple of weeks of torture and dog hair. We have showed them around the insides of all of the Home Depot's and Lowes' of the capital district and also the burrito joints around town. I still don't know why they visit.

We worked on the kitchen when we weren't inside the Home Depot. I am happy to say that we have a working range again and I have made a total of ONE meal! I was using the stove as an excuse for all of the burritos, but it turns out we just like burritos a lot.

Here's a short recap of the kitchen progress:

The Cook Nook:

This area used to be sort of a breakfast nook, but it has been renamed The Cook Nook. The plaster wall didn't turn out as well as I had hoped. I had some trouble with the finish coat, so I got some advice and tried a second finish coat, but I got distracted while doing it and didn't get it smoothed out before it set. I thought about skim coating it, but then I decided that a tin backsplash would be easier and with the rest of the stuff that was going to be on the wall that the plaster job was good enough. We installed the hood and potrack and then hooked the stove up and we are back in business! We probably should've finished painting the finish coats before hanging everything, but we got so durn excited that we couldn't wait. It's OK, Chris loves to tape and paint trim... hehe. The rest of the hood chimney will be installed after the ceiling is finished. The hood is stainless, it just looks orange because of the reflection from the last of the orange walls.

The ceiling:

Chris and I hung the Anaglypta in the main part of the kitchen. It was clumsy and sweaty work and we were both covered in glue by the end, but there are only about 10,000 wrinkles and gaps, so we feel pretty successful. I understand that the paper generally looks pretty bad until it's painted, and I am hanging on to that hope. We hung the strips at a dizzying rate of 1 per hour, so this project took 3.5 days of vacation.The ceiling will be painted silver for a faux tin effect. The metallic paint chips arrived this week, but we still haven't decided which shade of silver would be best.

Refrigerator:

We have now entered the era of modern conveniences with a new electric ice box. OK, we did have a modern refrigerator, but it was too big and too boxy for our small kitchen and since we are adventurous people we decided to look for an antique refrigerator. On Sunday we drove to South Hadley, Mass. to pick up this little beauty:
It's a 1941 GE in nearly perfect condition. I was a little worried, but it is so quiet and cold I can hardly believe it. We can fit most of our groceries (and boxes of wine) in it, but we had to get a supplemental freezer. While we were at it we also got a little fridge for the Man Area (den) so we can have cold beers and diet cokes near the TV. Everybody's happy.

The plan for the old fridge (it wouldn't fit down the basement steps) was to put it on the curb and list it on Craig's List for free, but it was gone before I had a chance to publish the ad. Hopefully someone's getting some use from it, I have some guilt about getting rid of a perfectly fine fridge.